After one year, I finally got my old computer hooked up with internet! Fuck yeah, but that..... Uh..... you see.... we had to disassemble part of my floor in my room, and drill a hole on my floor to my studio aka my basement. and that's how I got my internet back....... *is still putting back the wood floor in my room*
Atlease I have more time to cg and junks ^^;;;
Monday, October 18, 2010
Wednesday, October 13, 2010
10-10-2001 Sketchbook: Life Drawing


 Some sketches I done at a cafe and a lounge and of course my sister <3 onblur="try {parent.deselectBloggerImageGracefully();} catch(e) {}" href="https://blogger.googleusercontent.com/img/b/R29vZ2xl/AVvXsEhRbOWtr8JH3ide_omEArgCyuh9SK3TWz7PCJdY2BoUcp2cQ6zWbTjsGYy3wHYY52x3sNq2GF7FtIBIolDMsGnWBllyZx8heSH_6o0YJPHHlxiL4vtEwrgy_xrnV6_vGL1dUGrcpr_RiN8v/s1600/2010-10-13+13.30.09_Ellicott+City_Maryland_US.jpg">
 I love my shoes, stfu!


 Some study on other master artist. Some people might call me "tracer" But I'll tell you this, I'm not creating art, i'm "learning" by studying about other master marksmanship.


Some watercolor from real life. Very hard because I had to watercolor FAST, or else they start moving, lmfaooo~

 Some copicmarker sketches from real life..... when my lil sister and her friend was sleeping, lmfaoo~


 Nude drawing for 10 minutes.


Some other doodle from real life
10-10-2001 Sketchbook: Enviromental Design


Illustration a architecture. I went for a theme of shreding and inflation.


Studying and researching on desk and chair. I then take what I learn and create my ideal desk and chair. Still a work in progress right now.
 Shit, some note I took in class, but obviously I was doodling in class, ohohoho *is a no good student*
10-10-2001 Sketchbook: Illustration and Doodle
 First doodle I did in my sketchbook. I wanted to join this samurai fighting club on DeviantART. So I did some research for a character I design. I look at alot of Korean, Chinese, Japanese and weirdly, Spanish jewelry. I had fun~ All done with pen, fuck pencil! Also on the side, there's alot of cool illustration website you might wanna check up on~


 Work in my illustration class. The theme was family portrait. Second round is illustration some article I read.

 Some doodle I did when I was in class, lmfaoo~
 Character design for some webcomic I was thinking of making, but it's still undecided


My Illustration teacher was doing some fountain ink demo. He then forced us to draw our classmate with fountain pen. I..... so wanted to sketch with pencil first, but my teacher said "be CONFIDENT with your markmaking" So I fucked everyone portrait, lmfaoo~
Wednesday, October 6, 2010
Tutorial: How to fill in gap'd lineart
I'm sure alot of you fella had problem filling in your base color, because they have gap in the lineart. Trust me, I know how troublesome it is because when I draw out my lineart, I tend to have broken lineart, which I personally love the lineart style, but is a butt do fill in the lineart. I'm just going to show you tips, that will probably save many hours instead of hand filling in the base color.
A/N: You need a basic understanding of photoshop. Also beware of my bad english, thanks!
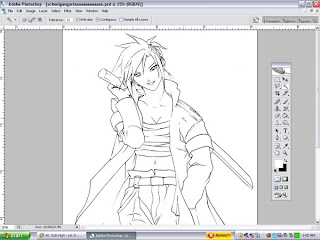
So here's is one of my latest lineart I done with pen. As you can see, there's ALOT of hole in the lineart, which I didn't noticed until I tried to use my magic wand and selected the area I wanted to fill in. You can see in the picture below
Akk! My color got into area I didn't want it to be filled into, damm, now I have to undo and have to fill it with my bare hand. Well not anymore! I will teach you have to master the magic wand!
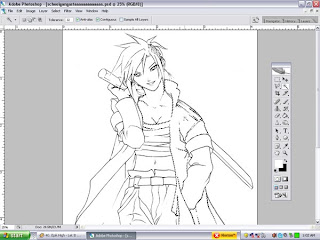
Step 1: First find "where" the hole is in the lineart. Just look around, it probably only take 20 seconds to find the leaking whole in your lineart.

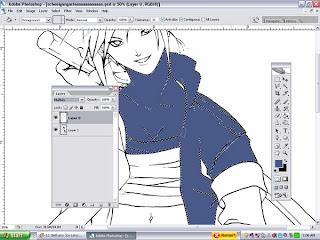
Step 2: Once you find all the leaking hole, make a new layer for your base color. Choose a color that you wish to fill in. I chose blue because I want to make the jacket blue. On the new layer, I want to cover the leaking whole, and so I dab a paint, covering the gap.
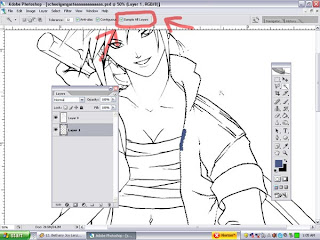
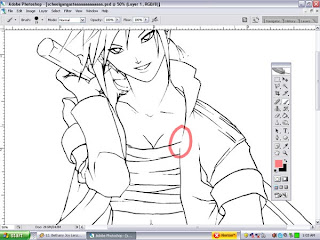
Step 3: Click on "Magic Wand" and at the top, click "Sample All Layers" What does that do? Usually when you use magic wand, it only select the area "In the layer" you are currently on. But "Sample All Layers" effect "All the layers" Now click on the area you want to select. It doesn't matter what layer you are on, whether it's the lineart layer or the base layer. All layer is being effected by the magic wand. Now that the gap in the lineart is closed, it will select only the area I wished to select, without bleeding in other area.
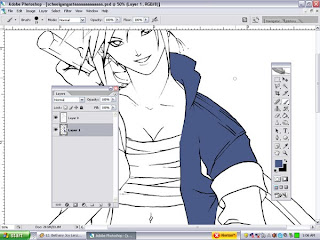
Final Step: After you select the area you desire, i'm sure you already know how to expand your selection by going to "Select">>"Modify">>Expand by either 2px or 3 px depending how thick your lineart is. you should get a perfectly fine base color, that only took 1 minutes of my time.
Onee-Sama No Yankee by *Lilbang on deviantART
My final product is the picture above. Quick as a lighting bug~ I hope I helped you with a nice quick photoshop tips wink*
A/N: You need a basic understanding of photoshop. Also beware of my bad english, thanks!

So here's is one of my latest lineart I done with pen. As you can see, there's ALOT of hole in the lineart, which I didn't noticed until I tried to use my magic wand and selected the area I wanted to fill in. You can see in the picture below


Akk! My color got into area I didn't want it to be filled into, damm, now I have to undo and have to fill it with my bare hand. Well not anymore! I will teach you have to master the magic wand!

Step 1: First find "where" the hole is in the lineart. Just look around, it probably only take 20 seconds to find the leaking whole in your lineart.

Step 2: Once you find all the leaking hole, make a new layer for your base color. Choose a color that you wish to fill in. I chose blue because I want to make the jacket blue. On the new layer, I want to cover the leaking whole, and so I dab a paint, covering the gap.

Step 3: Click on "Magic Wand" and at the top, click "Sample All Layers" What does that do? Usually when you use magic wand, it only select the area "In the layer" you are currently on. But "Sample All Layers" effect "All the layers" Now click on the area you want to select. It doesn't matter what layer you are on, whether it's the lineart layer or the base layer. All layer is being effected by the magic wand. Now that the gap in the lineart is closed, it will select only the area I wished to select, without bleeding in other area.

Final Step: After you select the area you desire, i'm sure you already know how to expand your selection by going to "Select">>"Modify">>Expand by either 2px or 3 px depending how thick your lineart is. you should get a perfectly fine base color, that only took 1 minutes of my time.
Onee-Sama No Yankee by *Lilbang on deviantART
My final product is the picture above. Quick as a lighting bug~ I hope I helped you with a nice quick photoshop tips wink*
Subscribe to:
Posts (Atom)